Monday, January 26, 2009

CHA Projects


I love this purse I was given to alter by Rebecca from Pink Paislee, it's something I would have picked out to alter for myself. It was definitely nerve racking though, being my first assignment and on top of that, it was for CHA. A double whammy!!! But it turned out fine, I made the deadline and hopefully my projects made it safely to the show.
I used the "Enchanting" collection for this project, which I love. It's really soft, pretty and girlie.


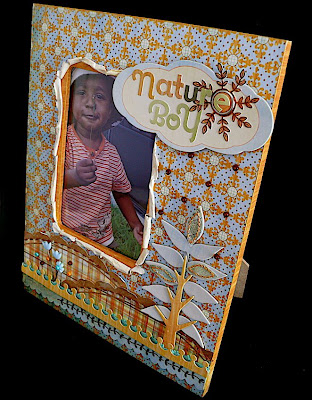
My next project is all boy, well "Nature Boy" that is! An altered frame made with the new "Captivating" collection. I used some of the new embellishments I mentioned in my last post. Don't you just love the letter stickers and the printed chipboard? If you click the links you can check out each collection in it's entirety.


Thanks for stopping by, see you soon.

Friday, January 23, 2009

It's Pink Paislee Time!


If you haven't stopped by the Pink Paislee blog this week, you may not have seen the 4 new mini collections they'll have debuting at CHA this week. I was so thrilled to be chosen to work with the Pink Paislee team this year, and then when received all the new products, I was even more excited!! Definitely, a little bit of something for everyone!!!! Although all the patterned papers are GORGEOUS, my favorite thing from each collection has to be the embellishments. JUST YUMMY I TELL YA!!! :) Be sure to visit the Pink Paislee blog today, to see all the new embellishments and you can check out the amazing show samples the rest of the design team made. You might even spot one or two of mine. :)
SO, which one's your favorite????

Monday, January 19, 2009

This chick gets to go to CHA!!!


I know, I know the chick is pink, but I had Jaiden with me when I was buying the supplies for this and she suggested PINK! ...... How could I to argue with "The Queen of Pinkness"!!!

This little chicka gets to go to CHA next week! So I'm pretty excited about that! I'm not going, but hopefully I should be able to go to the summer show.

Okay, so this is another wood craft I found at Hobby Lobby.
Here's a picture of the piece before it was altered, so if you want to make one you'll know what your looking for.


For most of this project (except where noted) I used the Helmar Craft and Hobby PVA Glue, perfect for wood crafts like this, because your paper doesn't bubble and has a fast drying time. So basically, I just made a little sign using chipboard, covered it with some patterned paper and added chipboard borders. Then I added a few embellishments, brads, ribbon and some strips of patterned paper. The chipboard letters and stickers were glued onto the sign using Helmar Liquid Scrap Dots. They needed to stand out more, because the background was so busy!


The edges of the egg and feet were painted and then I covered the surfaces with patterned paper.
The chicks head is a large pom pom with the ribbon and the eyes stitched into place. A beak was made from cardstock and patterned paper was then glued onto the pom-pom, using the Helmar Premium Craft Glue. I cut another pom pom in half and used the loose fur to cover the lower part of the chicks body. The leftover fur was used to create a wing.

Since I decided to put one of the chicks legs at an angle, I mounted it onto a 3"x5" oval base to give it some strength and stop it toppling over. The little basket shown was made out of a wood napkin ring.

Supply list:

Helmar Craft & Hobby PVC Glue
Helmar Premium Craft Glue
Helmar Liquid Scrap Dots
Patterned paper - Heidi Grace and Collage Press
Chipboard border - Pink Paislee
Chipboard letters - Basic Grey
Brads and paint and letter stickers - Making Memories
Velvet ribbon - We R Memory Makers
Cardstock - Bazzill
Wood cut out, 3" x 5" oval wood base, wood napkin ring, rick-rack, ribbon roses, pom-poms and beads - Hobby Lobby


Wednesday, January 14, 2009

Say Thank You With Roses!!!


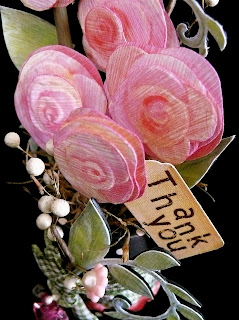
Here's a little "thank you" gift idea. All done using Helmar adhesives, of course!!! The roses and leaves are all cut out of the same sheet of patterned paper by K and Company. The paper I used is a couple years old, but you could use any floral patterned paper.


The rose petals are layered on top of each other using Helmar Liquid Scrap Dots. When the roses are dry just attach them to some painted wood dowels to create the stems. The leaves were glued onto some cardstock first before they were cut out, just to give them some strength.

The pot I used was solid on the inside, so I drilled holes into it to accommodate the dowels. If you can't find some thing similar, you could always use a mini plant pot with that "green foam stuff" on the inside. (Sorry I can't remember what it called, but it's used for flower arranging!)


Supply List:

By the way if you are interested in trying some Helmar products, don't forget about the GIVEAWAY they are running at the moment. Or you can always find their products at most Hobby Lobby stores.

Talk to you soon,

Jen

Monday, January 12, 2009

New Helmar Project

P1110226

I thought a card would be an excellent way "to show off" what you can do with Helmar Liquid Scrap Dots. I'm really not much of a stamper; however, when I use them, I like to cut them apart and give them some dimension.

For this project, I stamped the image of the mouse twice, using a brown fluid chalk. Then I heat embossed both images with a clear embossing powder. The cake and hat were stamped and embossed with a grey fluid chalk. Next, you color your stamped images using colored pencils, markers, or whatever you choose.

P1110218
Embellish the hat with some rick-rack. Add a little glitter to the top of the cake, and a little to the cake in the mouse's paws.
Next, piece your mouse together using the Helmar Liquid Scrap Dots. The great thing about this glue is that you can play around with it, while it's still wet. This is helpful so that you can get your levels of depth just the way you want them !!! I wanted the cake to appear to be the closest thing to me, so I used three levels of the glue (I placed a little bead of glue on the back of the cake, waited about a minute or so, then added another bead on top of that, etc.) The elbows have about two levels of glue, as does the pom-pom on the hat.
P1110241
Once the mouse is complete, use this template to draw a simple cupcake shape onto some patterned paper. Add swirls of Helmar Acid Free Glue to the frosting piece and then sprinkle with glitter.
For the base of the cupcake, just add thin strips of patterned paper attached with the Helmar Liquid Scrap Dots. The chipboard letters and stickers are added after the strips are dry.
Use the Helmar Acid Free Glue to adhere the cupcake pieces together onto some cardstock. Cut out the cupcake, then embellish with beads (the Helmar 450 Quick Dry Adhesive works perfectly for this).
The glittered shape behind the mouse, is half of a flower that was cut from patterned paper, and then mounted to cardstock for strength. The flower was then covered with glitter, and attached to the back of the mouse using Helmar's Acid Free Glue.
P1110220
To complete the card, attach a folded piece of cardstock to the back using Helmar Acid Free Glue. Allow to dry, and then trim away the excess cardstock. The inside of the card was finished with letter stickers, and some letters cut from patterned paper.
P1110247
Supplies used:
Patterned paper - My Minds Eye
Rubber Stamp - Stampabilities
Fluid chalk - Color Box
Letter stickers - Making Memories
Chipboard letters - Cherry Arte
Colored pencils - Stanford Prismacolor
Cardstock - Prism
Embossing powder - Stampendous
Glitter, rick-rack and beads - Hobby Lobby

Monday, January 5, 2009

Helmar Giveaway!!!!

Who couldn't use free glue, right! Well, Helmar is offering two lucky winners the chance to receive a box of adhesive goodies. Check out the blog for more details and your change to win!
Hurry, you only have till January 31st!!!!!

_TWB4982

Friday, January 2, 2009

Happy New Year!

Happy New Year everyone!!! I hope you had a wonderful holiday season! My family and I did, we had a quiet Christmas at home. Well, maybe not that quite with all the new toys going off at the same time, but you know what I mean!!!

Here's a couple pictures of the gift my kids "commissioned" me to make for their dad for Christmas. It's a little mailbox with mini album inside. I used a ton of Helmar's Liquid Scrap Dots to make the owls and leaf motifs look three dimensional.


Supply list:
Helmar - Liquid Scrap Dots
Helmar - Acid Free Glue
Helmar - Premium Craft Glue
Helmar - Quick Fix Adhesive Runner
Mail box with album, chipboard letters and chipboard heart - Maya Road
Patterned paper, stamps and glitter - Pink Paislee
Stamp - Sassafras Lass
Letter stickers - Basic Grey and Making Memories
Buttons - SEI
Pearls - Kaiser Crafts and Hobby Lobby
Stick pins - Fancy Pants
Chipboard tree - Glitz design
Cardstock - Bazzill
Paint - Making Memories
Other - Computer font (3Hour Tour), ribbon, twine and hinge - Hobby Lobby

I have some totally AWESOME news to share. I'm really still in shock, I just found out the news this morning, thanks to Tanisha and her comment on my last post. I was like, what is she talking about!!! (LOL) So I went over to the Pink Paislee blog, and sure enough I MADE THE DESIGN TEAM!!!! I've been on cloud nine ever since. So, if you have ever thought of trying out for a DT but thought you'd never make it - Go for it....IT COULD HAPPEN!!!! :)


Blog Templates by Delicious Design Studio