Showing posts with label Silhouette. Show all posts

Wednesday, October 31, 2018

Halloween Double Decker


Happy Halloween, everyone! Today I'm sharing a project based on a piece I created a few years ago. That treat holder was made from a bus shaped mini album and some DB supplies.


This time I'm using the Doodlebug double decker cutting file and the cute new Halloween collection, Pumpkin Party.  Same concept just on a bigger scale, because who doesn't want a treat holder that can hold more candy?!  :)


For more details you can see my post on the Doodlebug blog, here.

Thanks for joining me today and Happy Haunting!

Saturday, February 24, 2018

Punny Food TV

Hello, everyone. After a short hospital stay, I was inspired to create a "Get Well Soon" gift using the So Punny collection.


Once the recipient is feeling better the pinwheels can be removed and the box could be used for storage or as home decor. More details on this project can be found on the DB blog HERE.


Thanks for stopping by. :)

Thursday, July 6, 2017

Guest Post for Lori Whitlock


Hello, everyone.  Today I'm happy to be a guest over on the Lori Whitlock blog. Lori has been a favorite designer of mine for many years. Not only for her SVG files but for her paper and digital collections too.


As you can see, I decided to create a home decor piece to hang in my home. To see all the details and cutting files used, check out my post HERE. :)

Tuesday, July 4, 2017

Happy 4th July

Hello, everyone. I'm back today to wish you all a happy and safe 4th of July.


I'm also sharing this fun project featuring Doodlebug's Yankee Doodle collection. You can see all the details for this on their blog HERE.

Thursday, June 29, 2017

It's Party Time!

Hello, everyone. As you can see I've definitely been in party mode recently. Here are two more fun birthday centerpieces I created. The first one was made using Doodlebug's Dragon Tails collection. Isn't he just the cutest dragon you've ever seen.


And this is the other, a truck full of little party animals! :) For this project, I used the At The Zoo collection.


To get all the details on each project, you can check out the Doodlebug blog, links are under each picture. Thanks for stopping by. :)


Sunday, March 26, 2017

Collectible Pins and a Happy Rain Cloud

Hello, everyone. Today have two projects to share, the first one is a project I made for my collection of Doodlebug pins. These pins are so sweet and once you start collecting them you will become addicted!! :)  More details for this project are on the DB blog.


I also have a new listing in my Etsy store that is sure to put a "smile" on your face! :) This cute wall hanging is similar to one I've done before and I have another one planned in the near future. If you love Doodlebug, you'll love this piece as it's DB from head to toe".


Thanks for stopping by! :)

Tuesday, January 24, 2017

Sugar and Spice and Everything Nice


Hello, everyone. Today I am sharing a project featuring the new Cream and Sugar collection by Doodlebug Designs.  This collection is for Valentine's  Day, but can really be used for so much more.  I was inspired to create a decorative piece for a baby shower or first birthday.


More details on this can be found on the DB blog HERE. By the way, this piece will be available for sale at my Etsy store in the next day or so. :)

Wednesday, November 30, 2016

Tropical Santa

Hello, everyone! Today I'm sharing a project featuring some new "Fun in the Sun" cutting files by Doodlebug Designs.  Since I live in Florida, I thought it would be kind of fun to create a Christmas project with a tropical feel.

For more details on this project, you can check out my post on the DB blog.

Doodlebug Files Used:
Fun in the Sun - Tiki Drink, Sunglasses, Suitcases, Fan Leaf, Flamingo,
Here Comes Santa Claus - Santa on Scooter, Reindeer.
Flea Market - Trailer 1
Remember Doodlebug files are also available as SVG files at Lori Whitlock's online store.

Thursday, May 26, 2016

Smile


Hello, everyone.  Over on the Doodlebug blog for the next week or so,  the team and I will be sharing our take on the  "chunky twine" challenge.  After finding this fun image in the Silhouette store, I decided to use the twine to make colorful pom-poms drops for some cloud wall art.  Here are the finished results.


Here's the finished piece  hanging in my daughter's room.


Come over to the DB blog for more details on this project.

Monday, April 20, 2015

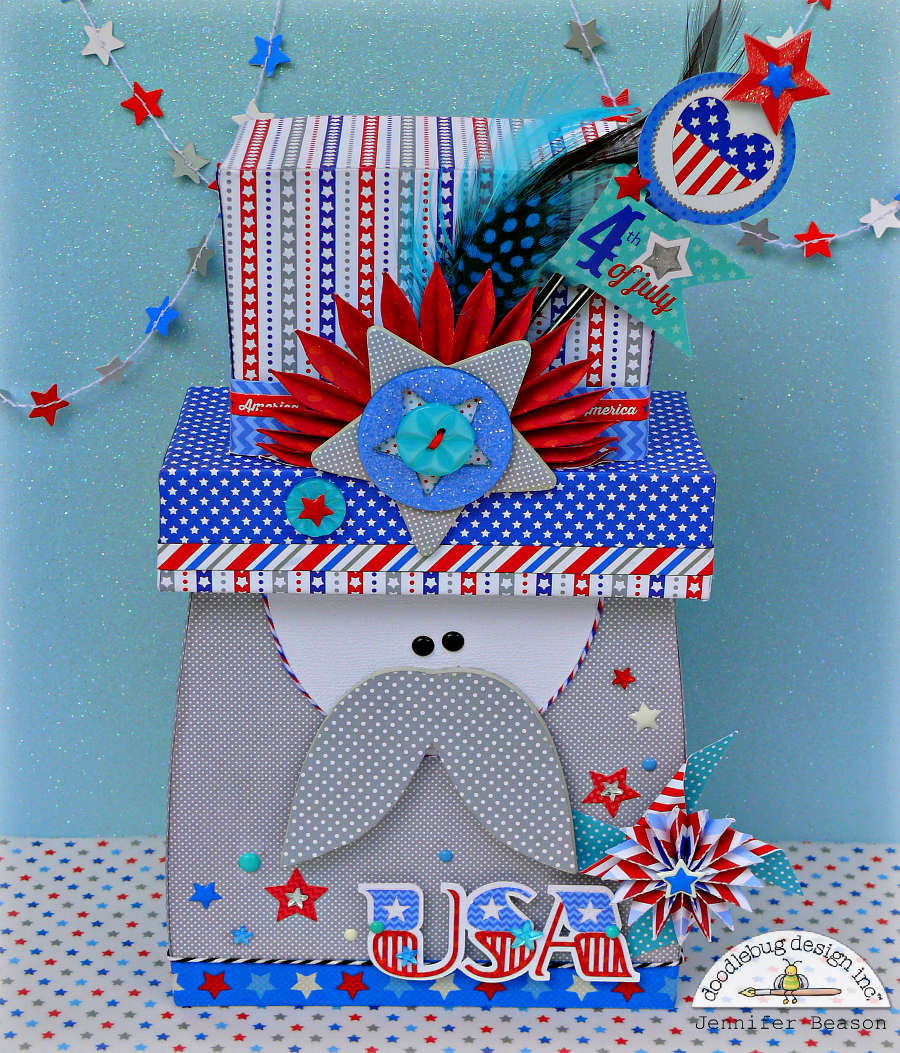
Uncle Sam Decor


Hello everyone. Today I'm sharing my Patriotic Picnic project on the Doodlebug blog.


Here's a peek of my Uncle Sam decor. More details for this project can be found HERE. :)


Additional Supplies
Silhouette Cutting files: Uncle SamUSA and 
Chipboard circle and star - Maya Road
Feather - Hobby Lobby


Tuesday, February 3, 2015

Bloom Where You Are Planted


Hello everyone. Today it's my turn to share a Hello Sunshine project on the DB blog. The inspiration and letters, for this project started with this silhouette file.
I know I say this a lot, but this is definitely one of my favorite collections. The prints and colors are just so much fun. :)


For more detail shots and the tutorial you can go here.


Wednesday, November 19, 2014

Christmas Countdown


Hello everyone! Yep, only 35 days until Christmas - Can you believe it?!!  I created this fun countdown for a friend, but all the details for creating your own are on the Maya Road DT blog.
The penguin is a Silhouette file (by Miss Kate Cuttables) and all the papers, die cuts, gems and stickers are from the North Pole collection by Doodlebug. Except for the black paper, which is from their Halloween Parade line.


I should be put on the naughty list for not posting these last month. But "better late, than never". These are some simple embroidery hoops made out of felt and lots of Maya Road embellies.  More details can be found HERE.


Thanks for stopping by! :)

Monday, July 21, 2014

Homespun


Hello everyone! I'm back to share my latest project for Maya Road. This windmill was created using the Home Sweet Home Album and other chipboard pieces. Of course all of the details can be found on the MR design team blog. But I did also want to mention that most of the patterned papers were from the Simple Stories Homespun Collection.


The bicycle, grass, vines and borders were cut on the Silhouette. Thanks for stopping by. :)


Tuesday, May 6, 2014

Peace, Love and Happiness

Hello everyone! It's been a while, but I'm back and ready to share a couple of fun Spring projects with you. I should have posted this on here last month, but luckily this wreath can be adapted to fit any season. I used lots of paper twine on this, one of my "go to" supplies, lately! :)


Full project pics and directions can be found on the Maya Road here. One thing not mentioned on the MR blog are the file Silhouette files used. They were chick holding egg, 3d rolled spiral flowers, 3d layered bow, and scalloped borders.

My next project is a piece I created for a guest spot for SVG Cuts.


Here's a link to how it was made and the files I used.


Friday, June 28, 2013

So Much Fun!


Nothing says summer like a crab fishing in sunglasses - right! :)


 Hi everyone! Just stopping by to show you my latest project. This little crab was made out of fabric and then painted with red acrylic paint. I used a basic doll head shape for the body and the claws were made using this cutting file on my Silhouette. The eyes are actually some recycled beads from a ceiling fan. You know the ones that dangle from the beaded rope pull.


 Here's another view from above. The umbrella was made out of a wood roof. The roof originally belonged to the house in my last project, but I think it works perfectly here as a shady umbrella for this guy.  Pennant stickers were used to create a flag on the top.

Enjoy your summer!
Jen :)
 
SUPPLIES
Silhouette - Cutting files (waves, anchor, sunglasses, steering wheel, fish and crab claws.)
Bazzill - Cardstock
Other - paper mache bucket, star and box lid, pearl beads, brads, wood dowels and twine. 

Tuesday, April 23, 2013

Enjoy The Little Things

Hi everyone! Today I get to share my Little Yellow Bicycle project with you all. I can't tell you how much fun I had, playing around with the Fern & Forest Boy collection! My project was inspired mainly, by the little elf seen here. Initially, he was going to be part of the project but because of the scale of things, I decided to leave him off.

If you have a chance, please stop by see more of my project on the new LYB blog.


Here's how the elf cottage was put together.

The Roof: The tip of a paper mache cone was cut off, then sealed up with a piece of chipboard. Three slits were cut along the bottom edge of the cone, then slightly curled up. Random shaped pieces of patterned paper were applied to the surface of the cone with mod podge. Then some hand stitching was applied to the seams. Some circles were cut out from patterned paper and applied to the roof along with some pearl stickers. Stick pins, twigs, paper and real feathers were tied together with twine and then attached to the front of the roof.

The chimney was made out of rolled recycled cardboard, that was fitted together then covered with patterned paper. A small paper cone was then adhered to the top and thin wire was wrapped loosely around it. A hole was made in the roof, then the chimney was carefully pushed into place. A little hot glue was applied on the inside of the roof to secure in place.


The House: For the main part of the house, I used part of a birdhouse. After covering the house with patterned paper, glue was applied to the bottom edge then turned upside down. The glue was allowed to drizzle down the sides of the house and glitter was applied. Leave the house upside-down and allow to dry. A doorway was cut out of some chipboard then wrapped with jute. A thin piece of wood was then adhered to the back of the jute, to create the door before it was glued onto the front of the house. Next, a piece of a canvas border was glued above the door in layers.


The Base: Two round box lids were covered with patterned paper then glued together before shaped borders were attached. A phase sticker and chipboard banner were then adhered to the bottom lid. The lids were then attached to an oval wood plaque. Once the base was complete, the house was glued in place. Glue was poured around the bottom of the house and more glitter was applied.


Thanks so much for stopping by.

Jen :)

Tuesday, March 19, 2013

Happy Birthday!


Hi everyone! It's great to be back and sharing a project with you all today. My youngest will be turning 7 the end of this month, so I wanted to make a centerpiece for his birthday celebration. My son likes cupcakes instead cake, so I thought this would work on the top tier of a cake stand, surrounded by some yummy cupcakes - Hope he likes it!


The Marvin the Martian outline was cut in black vinyl twice, using my Silhouette. The first vinyl cut out was placed on white foam board and cut out. Then the second one was used to add a little dimension to the piece. If you look on the side of Marvin you can see how I glued 2 layers of foam onto his "skirt," his shoes, helmet. (His visor is an additional layer cut from chipboard.) The solid primary colors were cut in paper, then cut and glued into place. I then painted the sides and back of the piece with black paint.


The number seven was hand drawn and then cut out of 2 layers of foam board and covered with patterned paper.  A zig-zag border was then applied around the edges. Pennant flags were stamped onto patterned and solid papers, strung together and then pinned in place with small pinwheels.


I used two paper mache boxes to create the base. They were covered with patterned paper and borders and a little zipper trim, then stacked. The number dial was created out of a large round sticker, that was mounted to some chipboard. I then used my Silhouette to cut a out the "happy birthday" border in black cardstock and attached it to the back of the dial. The traffic light is also a sticker that was mounted to some chipboard and  embellished with buttons.


 Supplies:
Maya Road - pennant stamps, trinket pins, zipper trim, wood buttons and chipboard circle.
Basic Grey - brad and solid papers (red, yellow, teal and green)
October Afternoon - patterned papers, stickers and die-cuts
Silhouette - Black vinyl, (cutting files: Marvin the Martian, arrow, borders and pin-wheels)
Other craft supplies -  2 round boxes, dowel, cardstock, foam core and raw chipboard.

Thursday, February 14, 2013

Some Bunny Loves You!


Hello everyone and Happy Valentine's Day! I made it back just in time to share my V- day bunny.


Here she is in a close up. Technically, I made her as a Valentine's decoration, but she's become a little pin cushion holder and now sits on a shelf just above my work area.

This project was very simple to make. The  pattern / image (seen below) is actually from my Silhouette library. I used a sketch pen to draw the image onto some cardstock, then cut it out by hand to make the pattern. After tracing out the images  onto some felt, I cut the pieces out and added about a 1/4" around each piece for the seam allowance.


The two body pieces were stitched together, turned inside out then stuffed. The ears were stitched together and turned inside out also, but instead of stuffing them I used a blanket stitch around the outer edges.  The ears were then stitched onto the head. For the front paws, I cut them out freehand. I wanted them to hold the heart and the original design's feet wouldn't have worked, as I needed them to look more like hands. I also decided to add a white muzzle, (which was also cut freehand) to the face and omit the teeth. The base the bunny is sitting on, is made out of a paper mache box lid. The lid was covered in felt and then embellished  with a felt border, ribbon and flower.


Supplies Used:
Fancy Pants - felt arrow, flowers and frames.
Maya Road - red flower
Basic Grey - felt trim and small hearts
Hobby Lobby - felt, paper mache box lid, stuffing, embroidery thread, micro beads, wood dowel.
Other - cardstock, black marker, brad, felt ric-rac and printer.

Have a great Valentine's Day!

Jen

Monday, December 10, 2012

The Season

Hi all! I'm back today with a quick post to share a gift card holder I made for my son's teacher. The owl design was from Lettering Delights. A really cool site I recently found, that has the cutest SVG files, graphic files and more.


I really didn't have to do much on this, I just added some fun embellishments, stickers and chipboard pieces on the eyes.

Under the head of the owl was a perfect spot to hide the gift card. So I made a small pocket out of patterned paper and added a few more stickers. Easy! :)

Supplies used:
Owl Design - Nancy Happy Holiday (Cut It Set) From Lettering Delights
Patterned Paper - Basic Grey and My Minds Eye
Stickers - Echo Park
Chipboard, Trinket pins and beads - Maya Road.
Baker's twine - The Twinery


Monday, July 30, 2012

Keeping It Simple

Hi guys! Hope you all enjoyed your weekend. Today I'm back to show you a clock I altered, very simply out of paper. This will be getting handled regularly, so I didn't what to have anything dangling or sticking out that might fall off. 


Mod Podge was used to adhere the paper to the clock, then a clear sealer was applied to finish and protect it. The patterned papers used on this project are all from the Basic Grey PB&J collection, including the paper on the face of the clock, which is from the 6x6 paper pad.


The number border used was cut out of vinyl using my Silhouette.


 Thanks for visiting! :)
Jen
 
Blog Templates by Delicious Design Studio