Showing posts with label Guest Design Work. Show all posts

Tuesday, May 6, 2014

Peace, Love and Happiness

Hello everyone! It's been a while, but I'm back and ready to share a couple of fun Spring projects with you. I should have posted this on here last month, but luckily this wreath can be adapted to fit any season. I used lots of paper twine on this, one of my "go to" supplies, lately! :)


Full project pics and directions can be found on the Maya Road here. One thing not mentioned on the MR blog are the file Silhouette files used. They were chick holding egg, 3d rolled spiral flowers, 3d layered bow, and scalloped borders.

My next project is a piece I created for a guest spot for SVG Cuts.


Here's a link to how it was made and the files I used.


Tuesday, April 23, 2013

Enjoy The Little Things

Hi everyone! Today I get to share my Little Yellow Bicycle project with you all. I can't tell you how much fun I had, playing around with the Fern & Forest Boy collection! My project was inspired mainly, by the little elf seen here. Initially, he was going to be part of the project but because of the scale of things, I decided to leave him off.

If you have a chance, please stop by see more of my project on the new LYB blog.


Here's how the elf cottage was put together.

The Roof: The tip of a paper mache cone was cut off, then sealed up with a piece of chipboard. Three slits were cut along the bottom edge of the cone, then slightly curled up. Random shaped pieces of patterned paper were applied to the surface of the cone with mod podge. Then some hand stitching was applied to the seams. Some circles were cut out from patterned paper and applied to the roof along with some pearl stickers. Stick pins, twigs, paper and real feathers were tied together with twine and then attached to the front of the roof.

The chimney was made out of rolled recycled cardboard, that was fitted together then covered with patterned paper. A small paper cone was then adhered to the top and thin wire was wrapped loosely around it. A hole was made in the roof, then the chimney was carefully pushed into place. A little hot glue was applied on the inside of the roof to secure in place.


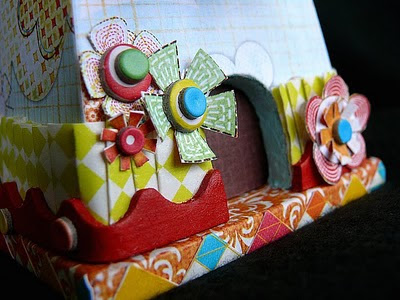
The House: For the main part of the house, I used part of a birdhouse. After covering the house with patterned paper, glue was applied to the bottom edge then turned upside down. The glue was allowed to drizzle down the sides of the house and glitter was applied. Leave the house upside-down and allow to dry. A doorway was cut out of some chipboard then wrapped with jute. A thin piece of wood was then adhered to the back of the jute, to create the door before it was glued onto the front of the house. Next, a piece of a canvas border was glued above the door in layers.


The Base: Two round box lids were covered with patterned paper then glued together before shaped borders were attached. A phase sticker and chipboard banner were then adhered to the bottom lid. The lids were then attached to an oval wood plaque. Once the base was complete, the house was glued in place. Glue was poured around the bottom of the house and more glitter was applied.


Thanks so much for stopping by.

Jen :)

Thursday, November 11, 2010

Let it Snow!!!


Hi guys, today I have my last project share for Ally Scraps. My son has been watching The Penguins of Madagascar a lot lately, and I think it definitely inspired me to do this piece.  Hope you like it!:)


Since being on the Samantha Walker design team, I have been using my Silhouette so much more. For this project I used two of Samantha's files. Then main one was the irregular scalloped border from her Scalloped Circle Border File Set. I used the border to cover most of the penguin body and head.  The lettering on the sides of the box and the red border (which is from Samantha's Wacky Borders set) was also cut on the Silhouette.


On the penguin's hat I used Maya Roads Vintage Crochet Trim, that was spritzed with some Maya Mist first. 
Below you can see the that I used Star Trinket Pins and pom poms to embellish the box.


I also used some of Samantha Walker's Swirl Die Cut Paper on the top of box. It was white to start off with, so I used some more Maya Mist to match up the cream color in the rest of the project.


Above the eyes I added pieces of chipboard scrolls that were cut into the "V" shape and then feathers were glued to the ends. You can find the tutorial for this on the Ally Scrap blog HERE.

Ally Scrap Supplies:
Cosmo Cricket Mitten Weather Collection - Flurries
Cosmo Cricket Mitten Weather Collection - Jack Frost
Cosmo Cricket Mitten Weather Collection - Woolens
Cosmo Cricket Mitten Weather Collection - Deck The Hollies
Cosmo Cricket Mitten Weather Collection - Festivities
Pink Paislee Queen Bee Collection - Worker Bee
Pink Paislee Queen Bee Collection - Bees Wax
Maya Road - Vintage Crochet Trim - Baby Pom Pom, White
Maya Road Trinket Pins
Maya Road Trinket Pins - Crystal Stars
Maya Road Mini Chipboard Set - Snowflakes
Maya Road Mini Chipboard Set, Scrolls
Other Supplies used:
Maya Road Mist - Buttermilk Cream
Maya Road Chipboard Wings Sheet
Plaid - Matte Mod Podge
Samantha Walker - Silhouette Files (Borders Wacky Set and Scallop Circle Border Set)
Samantha Walker - Swirl Die Cut Cardstock for Creative Imaginations
6" paper mache egg, paper mache ornament, paper mache box, tulle ribbon, feathers, felt balls, black pearls, gems, glitter, wire and raw chipboard.

Before I go, I just wanted to let you know about a few things going that Samantha Walker and Maya Road have going on at the moment.  Firstly if you haven't heard already Maya Road has announced their Early Winter Release.  Lots of cool new stuff!!!  One of which, is the new smaller size Maya Mists. 

You can check out the full release for yourselves on the Maya Road Company blog.
 
Then, Samantha Walker is looking for some crafty friends on Facebook.  When we reach the 2000 mark, which isn't too far off, Samantha will be giving out 2 prize packs full of goodies from her collections. So head on over to Facebook and tell her I sent you!!! :)

See you soon!


Tuesday, November 2, 2010

Ally Scraps and Samantha Walker!


Hi guys! I'm back with another one of my Ally Scraps projects.  I've been wanting to play with Echo Park's, Everybody Loves Christmas since it came out. I just love the pink, green and red combo for Christmas!  All the solid distressed papers used on the reindeer are  by Pink Paislee, like on the antlers, face etc. 
 

As you can tell from the title of this post, I combined some Samantha Walker product into this project as well.  Actually, I used a few of her Silhouette files to add some fun details. Here are a few close-ups. 

The eyes were cut from the "Animal Eyes" file. After cutting them on the machine, I used colored pencil and markers to add some more detail.
I used part of the "Laurel Leaf - Border Set" file on the front of the boots and the negative area of the "Border Dripping Circle" around the top.
Above, you can see the 1 Piece Leaf Cluster was used on the hat, and more of the (negative) Dripping Circle Border around the edge of the hat.
Here you can see the actual "Dripping Circles Border" used on the jacket detailing. I used two over-lapped rows of the border and added Trinket Pins in the center of each circle.

You can get full details on putting this project together HERE on the Ally Scraps blog.

On a different note, I've had a few people ask me what type of glue I use on my projects. Well, when I can find it, I like to use Helmar's Craft and Hobby Glue. I really need to get a huge jug of the stuff, I go though it so fast!  I also love using Plaids Matte Mod Podge which is what I used on this project.

Thanks for stopping by, guys! :)

Ally Scraps Supplies:
Pink Paislee Queen Bee Collection 12x12 Double Sided Paper Paper - Honeycomb
Pink Paislee Queen Bee Collection 12x12 Double Sided Paper Paper - Bees Wax
Pink Paislee 365 Degrees Collection 12x12 Double Sided Paper Paper - Be Free
Echo Park Paper Everybody Loves Christmas Collection - 12x12 Paper - Ornaments
Echo Park Paper Everybody Loves Christmas Collection - 12x12 Paper - Trim The Tree
Echo Park Paper Everybody Loves Christmas Collection - 12x12 Paper - Bright Stripes
Echo Park Paper Everybody Loves Christmas Collection - 12x12 Paper - Christmas Bells
Echo Park Paper Everybody Loves Christmas Collection - 12x12 Paper - Christmas Words
Echo Park Paper Everybody Loves Christmas Collection - 12x12 Paper - Borders
Echo Park Paper Everybody Loves Christmas Collection - 12x12 Paper - Alpha Stickers
Maya Road - Chipboard Snowflake Coaster
Maya Road - Trinket Pins
Maya Road - Vintage Crochet Trim - Baby Pom Pom - White
Maya Road - Velvet Pleat Flower


Other Supplies:
Maya Road - Flower Petals 2 Chipboard Set
Maya Road - Foundation Chipboard Set
Pink Paislee - Enchanting Collection -12x12 Paper - Pleasant
October Afternoon - Good Cheer Collection Stickers
Samantha Walker - Silhouette files (Border Dripping Circles, 1 Piece Leaf Cluster, Border Frame Set - Laurel Leaves and Animal Eyes.)
Plaid - Mod Podge (Matte) and Folk Art Paint (Raw Umber and Taffy)
Hobby Lobby - Red and green tulle, bell, fur trim, 2 - 4" styro-foam balls, chipboard or cardboard, small box, Babushka doll and base with legs (recycled from wood cutout)

Thursday, October 21, 2010

A New Layout!

Hello everyone! Today I have something unusual share - a layout! :) It's one of my projects for my guest spot with Ally Scraps, this month.  I'm so rusty when it comes to doing layouts these days, I'm glad a had a sketch to go by.  Not just any sketch mind you.  Take a look at this awesome sketch by Becky Fleck from Page Maps


If you love the sketch too, Becky and Ally Scraps are having a contest. Submit a layout based on the sketch and you could win a $35 gift certificate to Ally Scraps!!! You still have some time to enter, the contest ends at midnight, October 24th (MST). Get all the details here.

Here's my take on the sketch.
.
 

See ya soon! :)
Jen

Ally Scraps Supplies
Graphic 45 Halloween in Wonderland Collection - Wonderland Classifieds
Cosmo Cricket, Togetherness Collection - Kite Strings
Cosmo Cricket Togetherness Collection - Borders
Cosmo Cricket Togetherness Collection - Pinwheels
Cosmo Cricket Togetherness Collection - 12" Chipboard
Cosmo Cricket Togetherness Collection - 6" Chipboard
Cosmo Cricket Material Tiny Type Stickers - Cream
Maya Road Mini Chipboard Set - Caroline Alphabet
Maya Road Trinkets Pins Leaf (Green)
Maya Road Trinket Pins - Leaf (Brown)
Maya Road Ribbon - Scallop Dot Ribbon - Green
Maya Road Ribbon - Scallop Dot Ribbon - Red
Maya Road Ribbon - Scallop Dot Ribbon - Yellow
Maya Road Ruffle Blossoms - Yellow
Maya Road Mini Chipboard Set - Butterflies
Pink Paislee Expressions Glitter Alphabets - Cherry

Thursday, October 14, 2010

Getting ready for Halloween!

Hello guys! Are you ready for Halloween? My kids are still trying to decide what to dress up as, and trying to convince me to dress up too! Not sure if that will happen, but I am ready for Halloween, project wise anyway! This month I'm lucky enough to be guesting for Ally Scraps!!!

Here's a look of my first project for them.


 All the details for this batty project can be found here on the Ally Scraps blog.

If you want another Halloween idea come back later this week and I'll be sharing a fun project for Maya Road! :)

Before I go, I do have some exciting news to share. I'm now on the Samantha Walker Creative Team. I'm so excited about the possibilities of this team. This will be something a little different for me "as far as" working for a designer. Not only will I get to work with scrapbooking products, but stamps, fabrics and dies for the Silhouette. I'm really looking forward to doing some sewing and pulling out my neglected Silhouette. I'll be working alongside an amazing group of talented ladies too!  To see the team announcement check out Samantha Walker's blog.

Wednesday, May 26, 2010

Happy Windmill Wednesday!!!

Hello again! :) Just popping in for a quick post. As promised, here's my last project share for Kreatorville Krafts. I had such a great time creating for Keandra - She's a real sweetie!!! The May kit which I used on this has sold out. But check out her other kits, if you like bright, vibrant kits with a cool twist, you'll love these!!!

The last time I was at Michaels, I picked up a little windmill to alter. I loved the happy colors in the Kreatorville kit and thought they would work well together.

I used the Pink Paislee tape and Sassafras letter centers and dots from the kit to embellish the sides of the windmill. A chipboard button from the kit was used behind the windmill blades, just to add a fun element.

I did cheat a little, the chipboard border and gear (seen above and below) are not in the kit, but from my Maya Road stash. And the pennants around the sides were also from some old Sassafras paper of my own.... shhh! :)

Here in the roof close up, you can see I used the pattern of the paper to create the look of shingles. Do windmills even have shingles??? (lol)

Before I go, I just want to say a big, big "thank you" to Keandra and the Kreatoville team for having me this month. I was so inspired and had real a blast - you guys are the best!!!

Friday, May 21, 2010

More Kreatorville Krafts!

My oldest son will be graduating from high school very soon, next month to be exact. It's unbelievable to me that 18 years have past so quickly. I really wish I could get him safely tucked under my wing forever, but of course I can't. I made this picture frame to hang in my scrap room, to remind me how quickly time flies.


This is a picture of him when he was almost one, such a little cutie, right - drool and all!!! :)


The frame was made from the leftover lid from the "Pin Box" project in my last post.


Everything on this except the recycled embellishment lid, fur, raw chipboard and buttons are from the Kreatorville Krafts May kit.
One of my favorite things from the kit, has to be the Mix + Match Chipboard Letters - So, so yummy!!! :) As you can see I used them for the title and the owls eyes on this project.


The lid was covered with patterned paper first. Then some raw chipboard was glued to the back of the lid, so the picture could sit inside. I also made the wings out of raw chipboard and used the fun papers from the kit to decorated them. Some green twine was used to make a few feathers on the owl's head and I also used it to make a loop at the back of the project, so I could hang it on the wall.

Thanks for stopping by today! I'll be back with my last Kreatorville project soon.

Wednesday, May 5, 2010

Diva Au Naturale


Hello guys! As promised I have another project to share with you. It's another layout and it's all about me this time, not one of my best subjects - You would think writing about yourself would be easy, right!!! :) The "mini me" bobble-head and diva element are hand drawn embellishments made by Keandra at Kreatorville Kraft.


supplies used:
Kreatorville Krafts - Hand drawn embellishments.
Maya Road - Chipboard (tree and fence) and Kraft envelope.
Basic Grey - Patterned papers and stickers

Monday, May 3, 2010

Kontributing Kreator!

Hello everyone. Long time no blog - I know, I know!!! I'm sorry, but life gets in the way sometimes!! :) Anyway, I hope you all had a wonderful weekend. Did you do anything fun for NSD (National Scrapbooking Day)? I got started on a few DT projects, checked out a few blog hops and did a little online shopping.

Anyways back to business. Last year, the very sweet and talented Keandra from Kreatorville Krafts asked if I would be a guest designer, for her then, new company. Unfortunately, at the time I couldn't fit it in. But I'm happy to announce that this month I'm finally a Kontributing Kreator. Here's one of my first projects using the May Kreatorville kit and this awesome sketch by Tiffany Sanders.
https://blogger.googleusercontent.com/img/b/R29vZ2xl/AVvXsEi6DiaHBFu3gx3aD-hOcrTiA2jZSBfHoEYR3HjUfQTvJ5zGRoW439eBLpF6diU-nCqrCHbHZ8mkzmmw0LcqHmYRbUbNKUkBlRjTspIlkBFvIB9copDpOQG2ArNxr2_1qairAIPn7-M7e6hd/s1600/Sketch5.jpg


A few close ups.
I'll be back real soon with another project for Kreatorville Krafts.


Supplies:
Kreatorville Krafts (May) Kit
Pearls - Kaisercraft
Small letter stickers - October Afternoon
 
Blog Templates by Delicious Design Studio